Nothing beats fresh homegrown tomatoes. They’re great in sauces, salads, and sliced with just a dash of sea salt and fresh ground pepper. Luckily for us, Southern California is a perfect place to grow these fruits, and here we've listed some of the best tomatoes to grow in San Diego. This easy-to-follow guide will have you enjoying your own tomatoes in no time!
Quick Answer
The Best Tomatoes to Grow in San Diego
- Beefsteak tomatoes
- Salad tomatoes
- Plum tomatoes
- Cherry tomatoes
- Heirloom tomatoes

----
A Comparison
Growing Tomatoes in San Diego
|
Variety
|
Season to Plant |
Characteristics
|
Ways to Enjoy
|
| Beefsteak tomato | Spring | Large fruits with thick, meaty flesh | Perfect to slice for sandwiches |
| Salad tomato | Spring | Medium sized, juicy, slices hold together | Add to a salad or slice to accompany a meal |
| Plum (Roma) tomato | Spring | Egg-shaped, thick skin, less juicy | Great for baking, canning, sauces, etc. |
| Cherry tomato | Spring | Small, round, and flavorful | Use in salads, grill on skewers, or just snack on them! |
| Heirloom tomato | Spring | Superb flavor, unique appearance, look for "VFNT" varieties | Good for slicing, even on their own with salt and pepper |

Planting
Where and When
Tomatoes grow when the weather and soil are warm. This is typically in early March near the coast and 2-4 weeks later inland. Tomatoes like at least eight hours per day of good sunlight. If the plant produces larger tomatoes, it needs more sunlight. However, your plants need at least six hours of sunlight in order to produce fruit. This is part of what makes sunny San Diego such a great place to grow tomatoes.
Short on space? Apartment and city dwellers can grow just about anything in a container garden on patios, balconies and even windowsills. Tomato plants fare better if they're planted in larger containers, although many varieties will do well in 5 gallon plastic nursery containers.

Here are some container gardening tips:
- Once you’ve chosen your containers, fill them with a quality potting soil such as Gardner & Bloome® Potting Soil, or Ocean Forest Potting Soil.
- Container tomatoes require more frequent watering and fertilizing. Water when the soil just starts to dry, until some of the water drains out the bottom of the container.
- Use a quality organic fertilizer such as G&B Organics Vegetable and Tomato Food as directed on the label.

Seeds vs Transplants
Planting Tomatoes in San Diego
Seeds - If you’re interested in a “from scratch” garden experience, planting your tomatoes from seed is right for you. You can either plant them directly in the garden or start them in containers. Keep the following in mind:
- Plant your tomato seeds when the soil is warm, at least 65°F, if you’re planting directly outside. Choose a sunny location and work the soil well. In warmer climates you can start as early as January indoors.
- If you’re planting in containers, you need to plant the seeds 6 to 8 weeks before you’re ready to transplant. Grangetto’s Speedy Roots Seed Starter Trays are perfect for starting seeds indoors.
- Whether you’re planting outdoors or indoors, put 2 to 4 seeds in each area, cover them with about a quarter inch of soil and water the soil thoroughly. We recommend rich organic soil such as Kellogg® Gardner & Bloome® potting soil.
- Lightly water the area when you notice the surface getting too dry (either in the morning or the evening).
- If you’re planting indoors, once the seedlings sprout they need to get sun (or use a grow light) for at least eight hours a day.
- Thin the seedlings once they have two sets of leaves, leaving only the strongest seedling in each pot.
- Keeping the soil moist is important during the sprouting process!
- Check out this article for transplanting your seedlings

Tomato transplants - Look for healthy plants with leaves that have a medium green color. Your young tomatoes should be planted as soon after you buy them as possible. Follow these simple instructions:
- Dig a hole deep enough to cover the soil ball/roots well with the soil
- Space your plants 2-3 feet apart
- Water them right after you plant, making sure to wet the soil at least 2-3 inches deep.
- Select a disease-resistant VF-1 hybrid variety, such as Ace, Better Boy, Celebrity, or Early Girl
- Try to transplant during cool hours in the morning or evening so the plants do not suffer excessive shock in the process.
Don’t worry if your plants look a little sad the first day or two; they are simply adjusting to their new home. Make sure to place a tomato cage around the plants before they get too big. Transplant successful!

How to Grow Tomatoes 101
Tips to Grow Tomatoes in San Diego
SOIL
Tomatoes are not terribly picky when it comes to soil type, but they do require good drainage. If your soil is sandy or contains a lot of clay, mixing in some compost helps increase the nutrient content. The garden professionals at your local Grangetto’s can point out the fertilizer that’s best for your growing needs. Simply spread the fertilizer over your garden and work it into the soil to a depth of 8 inches.
You’ll want to add some more fertilizer when your plants begin to produce fruit. Spread it around the plants approximately 1 foot from the stems, then rake it into the soil and water the plants. As long as your tomato plants are producing new fruit, apply some more fertilizer once a month or as directed on the package label.
WATER
Water your plants roughly once a week. Typically, that’s about every time the soil begins to dry out on the surface. After the first month, watch your tomatoes’ leaves to help you determine when to water. Check in the coolness of the morning—if the leaves are drooping, that’s the perfect time to water. This is typically once every 5 to 7 days.
Avoid overwatering: it’s natural for your tomatoes’ leaves to droop in the midmorning or afternoon heat. Don’t water them then—always check and water in the coolness of morning.

MAINTENANCE
Now the process of regular maintenance begins. Make sure to soak the plant well throughout the growing season, and fertilize your planting areas once every 3-4 weeks to guarantee beautiful fruits.
- Supporting Tomato Plants: Tomatoes are binding plants, so they’ll spread out as they grow. Supporting your plants by tying them to wire cages or wooden stakes not only helps conserve garden space but also helps reduce insect damage and decay by lifting the fruits off of the ground. Tomato cages work perfect for this.
- Pruning tomatoes: Contrary to popular belief, pruning the “suckers” doesn’t increase tomato production. In fact, pruning can actually result in low production and sun-scald.
There are a few other mid-season tasks that will help your tomatoes as they grow, such as mulching, amending, and applying foliar spray. See this article for more details.

Harvesting Tomatoes
How to Harvest Tomatoes in San Diego
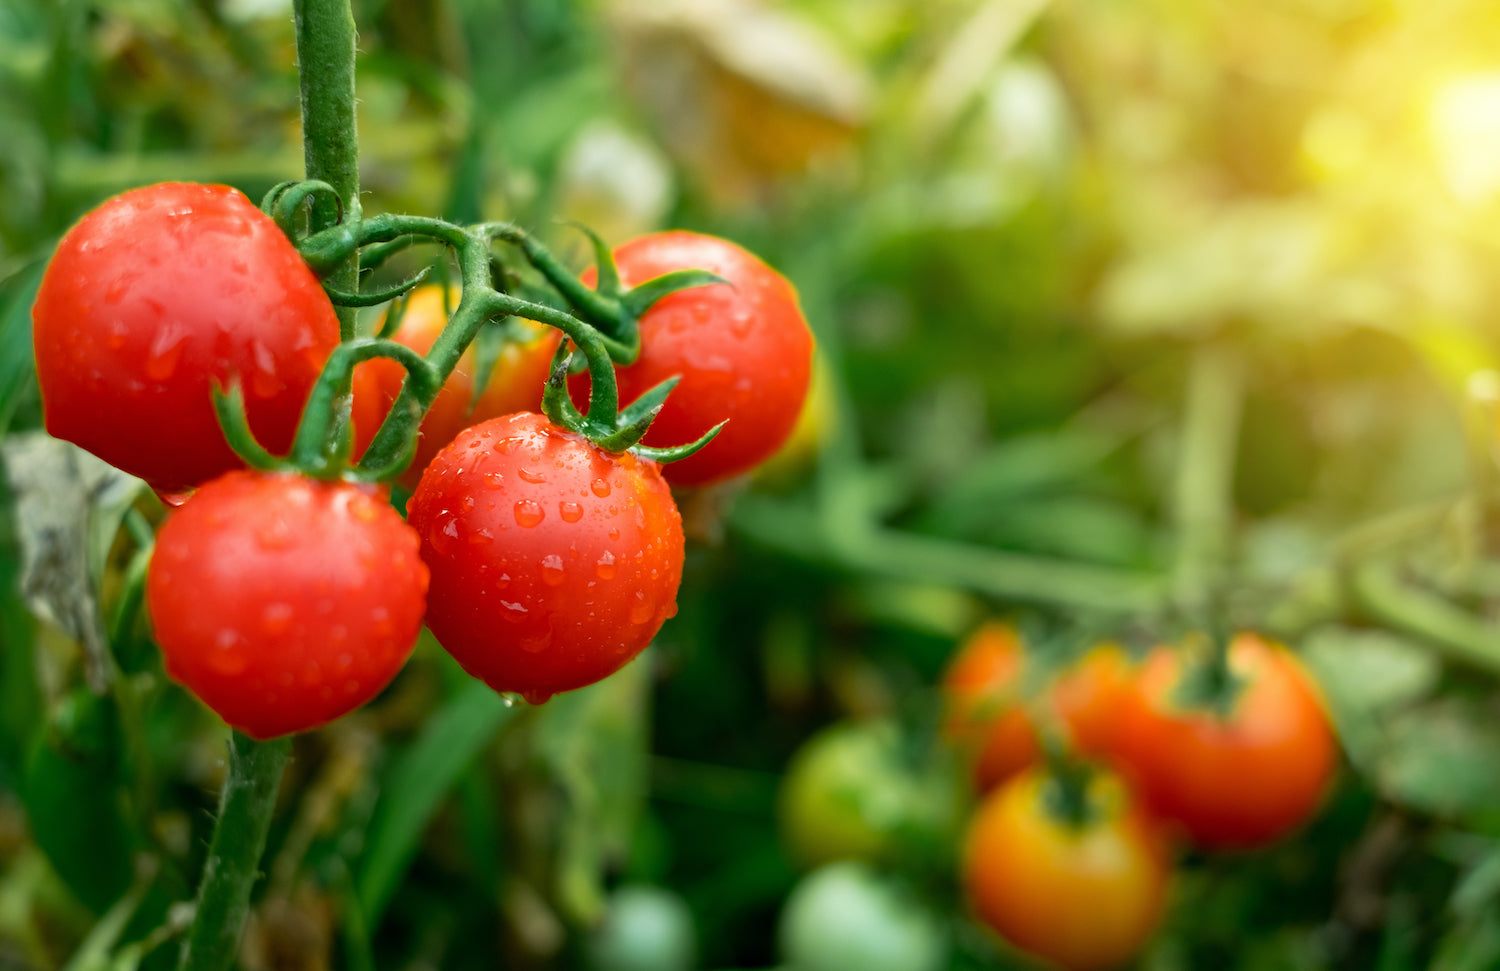
You want to do everything you can to preserve the wonderful flavor of homegrown tomatoes. Always harvest 24-48 hours after watering, when the sugars in the fruit are more concentrated.
Harvesting here in San Diego is generally around mid-July. Each type of tomato plant will produce fruit at a different time. You will know it’s time to harvest your tomatoes because they will have changed color from green to their maturity color of red, yellow, orange, or even purple depending on the variety. Ripened tomatoes will easily give way from the vine.
The simplest post-harvest flavor preserving tip is not placing your freshly harvested tomatoes in the refrigerator. Tomatoes taste better when they’re stored at above 50°F, especially if you’re trying to maximize flavor on vine-ripened tomatoes.
Enjoy your home-grown tomatoes!
More Resources: